Opening and Closing Puppeteer Instances Over and Over Again
Editor'southward note: This tutorial was concluding updated and validated for accuracy on 7 July 2021.
In this React end-to-end testing tutorial, we'll show y'all how to write end-to-terminate tests for React apps using Jest and Puppeteer.
We'll cover the following:
- What is finish-to-end testing in React?
- What is Jest?
- What is Puppeteer?
- React end-to-end testing example
- Debugging options with Puppeteer
- Using Jest Puppeteer
What is end-to-end testing in React?
End-to-end tests (E2E) simulate bodily user actions and are designed to test how a real user would likely use the awarding. React E2E testing helps ensure that the code you wrote is functional and your app works as intended. It's a mode of catching bugs in your lawmaking earlier you go alive with your React app.
There are iii common approaches to testing React apps:
- Unit of measurement testing to bank check that individual units of code (mostly functions) work as expected
- Integration testing in which private units/features of the app are combined and tested as a group
- Finish-to-end testing to ostend that the entire range of features works from the user'south perspective
In this tutorial, we'll apply Jest and Puppeteer to perform end-to-terminate testing in React to verify that certain features work every bit expected.
What is Jest?
Jest is a testing tool created by Facebook for testing React apps. It's also used to exam Babel, JavaScript, Node.js, Athwart, and Vue.js apps, and can be used with NestJS and GraphQL every bit well.
Jest is designed with simplicity in mind. It offers a powerful and elegant API to build isolated tests, snapshot comparison, mocking, examination coverage, and much more.
What is Puppeteer?
Puppeteer is a Node.js library that provides a high-level API to control headless Chrome or Chromium over the DevTools Protocol.
With Puppeteer, you can scrape websites, generate screenshots and PDFs of pages, act as a crawler for SPA and generate prerendered content, automate your grade submissions, test UI, admission spider web pages and extra information using DOM API, and automate performance analysis.
In this tutorial, we'll use Puppeteer to behave out tests from a user's perspective.
React cease-to-end testing examples
To prove how E2E testing works in React, nosotros'll write tests for a functional React app and meet what happens when the tests pass and fail.
To get started, we'll use Create React App to create a new React app:
npx create-react-app react-puppeteer
Once the project directory has been created and installed, navigate to the newly created directory and run the command below in your terminal to install puppeteer in the codebase:
yarn add puppeteer
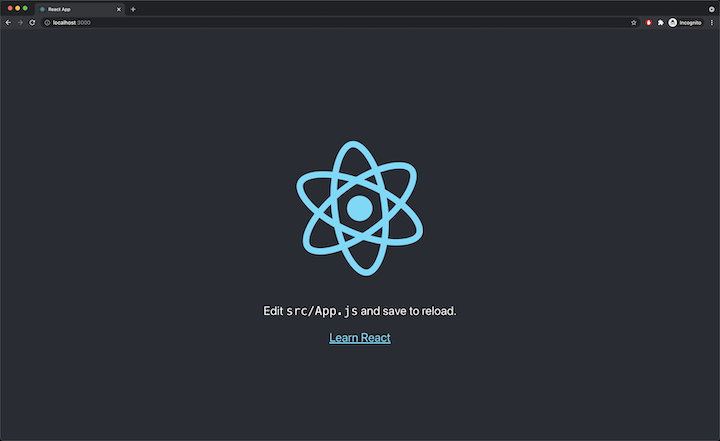
Beginning the React app with the command yarn start and the dev server should exist up at localhost:3000 . Yous should meet a welcome page like to the 1 below:
Testing that a folio has a text
For our commencement stop-to-end examination, we'll test to ensure that the correct text is displayed on the page. Nosotros want to verify that the text Edit src/App.js and salvage to reload. is present on the homepage.
Create a new file chosen e2e.exam.js and edit it with the code below:
import puppeteer from "puppeteer"; describe("App.js", () => { allow browser; let page; beforeAll(async () => { browser = wait puppeteer.launch(); page = expect browser.newPage(); }); information technology("contains the welcome text", async () => { await page.goto("http://localhost:5000"); await page.waitForSelector(".App-welcome-text"); const text = look page.$eval(".App-welcome-text", (e) => e.textContent); wait(text).toContain("Edit src/App.js and save to reload."); }); afterAll(() => browser.close()); }); In the beforeAll office, which is chosen before any of the tests in a test file is run, a new case of Puppeteer is created and assigned to the browser variable. In turn, a new page case is created and assigned to the folio variable.
A practiced way to test that a page has a text or a certain element is to exam whether that element's selector is present on the page. In the test block, we tell Puppeteer to first navigate to localhost:5000 (which is a server that we'll fix soon) using the goto method. Then, Puppeteer waits (using the waitForSelector method) for an chemical element with the selector .App-welcome-text .
The content of the chemical element with the selector is then used to assert whether the page loads the correct text. Puppeteer allows you to target elements on a page using selectors (this could be a CSS class or an id) and then examination for different cases.
To run the end-to-end test, we'll utilize react-scripts, which has Jest installed internally. Modify the package.json file and add together the lines below to the scripts object:
"test": "react-scripts test --testPathIgnorePatterns=.*e2e.test.js", "test:e2e": "react-scripts exam --testPathPattern=.*e2e.test.js$",
This volition ensure that yarn test only runs all tests (i.eastward., unit tests) except for end-to-end tests and the yarn examination:e2e simply runs end-to-end tests. The --testPathPattern means Jest volition merely run files that have the pattern e2e.test.js.
Earlier we run the test, we demand to build the React app for production and prepare it up on a unproblematic local server. Run the post-obit commands:
yarn build yarn global add together serve serve -s build
The yarn build control builds the app for production and stores the built files in a folder called build. To set up up a local server to host the built files, nosotros install serve. serve is a static file server and directory list server. The serve -south build command starts up the server and you should have the react app upward and running at localhost:5000.
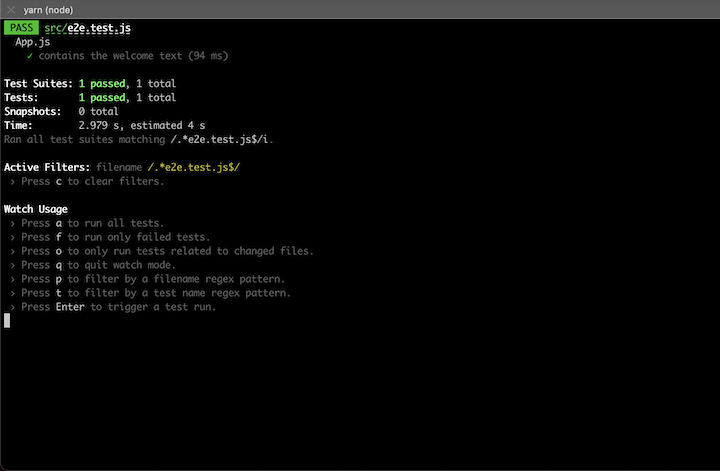
At present, run the yarn test:e2e control in another terminal window/tab. The test should showtime running and laissez passer just like the screenshot beneath:
Testing page navigation
Because Puppeteer allows you to mimic user interactions on a page, nosotros can test to verify that a folio navigates to the correct next page.
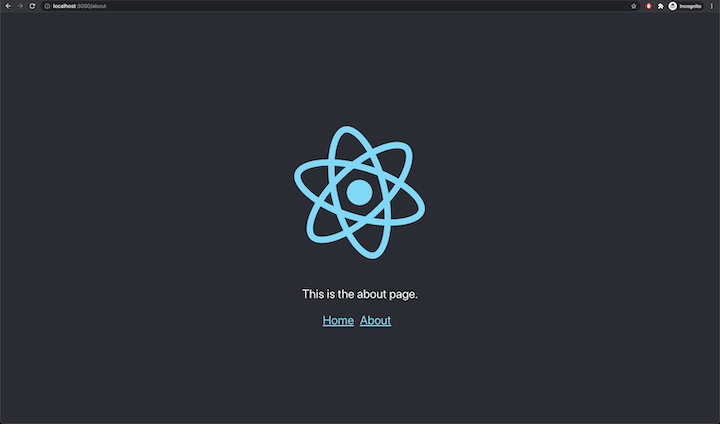
This GitHub co-operative contains a modified version of the create-react-app app we created earlier. I've gone ahead and installed react-router and as well added a new page at the /nearly route that only displays the text, This is the about page.
Clone the branch and start the React app with yarn kickoff:
We'll write a exam to verify that clicking the about folio link on the homepage loads the virtually page.
Create a new file chosen e2e.test.js and edit it with the code below:
import puppeteer from "puppeteer"; describe("App.js", () => { let browser; let page; beforeAll(async () => { browser = await puppeteer.launch(); page = await browser.newPage(); }); it("navigates to the about page", async () => { wait folio.goto("http://localhost:5000"); expect page.waitForSelector(".App-welcome-text"); await page.click("#most-page-link"); look folio.waitForSelector(".App-welcome-text"); const text = await page.$eval(".App-welcome-text", (e) => eastward.textContent); wait(text).toContain("This is the well-nigh folio."); }); afterAll(() => browser.close()); }); Permit'southward go over the exam to a higher place. Like the previous test we wrote, the beforeAll function is used to create new instances of Puppeteer and a new folio. So we navigate to localhost:5000 and look for the folio to load.
In the App.js file, the nigh page link has an ID of about-folio-link, which is what we used equally a selector to simulate clicking on a link. This can exist done by using Puppeteer's .click() method. The method triggers a navigation event in the browser (i.e., going astern or forwards in the browser's history).
Run the command below to build the app and too offset a simple static server so that the React app is available at localhost:5000:
yarn build && serve -s build
Now, run the yarn test:e2e command in another last window/tab and the examination should pass successfully.

A common employ case for testing folio navigation is when you need to ensure that a user is redirected to the dashboard folio later on logging in from a login page.
Testing form submissions
Puppeteer too supports simulating class submission in a web app. With methods such as .type and .click, you can simulate a user entering their details and clicking a submit button.
In this example, we'll test a login class that has two input fields: Email Address and Password, and a Submit button. Nosotros'll exam to verify what happens when the e-mail or password details are correct and when wrong authentication details are entered.
Let'southward start by cloning this co-operative, which contains the already-congenital login grade and the logic to handle right/incorrect hallmark details.
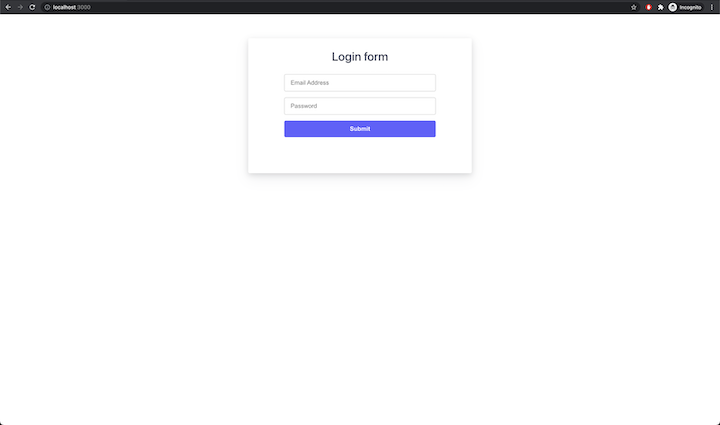
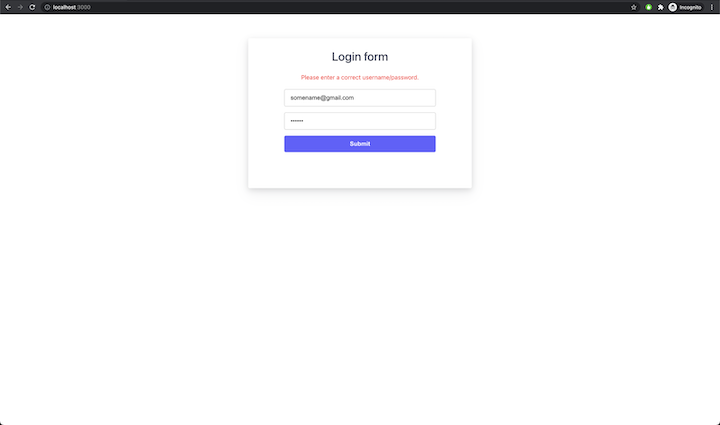
Start the dev server with yarn beginning and yous should meet a page similar to the one below. The form here has been hardcoded to only accept [electronic mail protected] for the e-mail accost and password for the password. It displays a You are now signed in. text if the details are correct.
Any other combination of e-mail accost/password will trigger an error text that looks like the 1 below. Notation how in the codebase, the fault text has a class.
Let'southward become started writing the tests. Create a new file called e2e.test.js and edit it with the lawmaking below:
import puppeteer from "puppeteer"; describe("App.js", () => { let browser; let folio; beforeAll(async () => { browser = await puppeteer.launch(); page = wait browser.newPage(); }); information technology("shows a success message later submitting a course", async () => { await page.goto("http://localhost:5000"); await page.waitForSelector(".form-header"); look folio.click(".form-input__email"); await page.blazon(".form-input__email", "[electronic mail protected]"); await folio.click(".form-input__password"); await page.blazon(".course-input__password", "password"); await folio.click(".form-submit-push button"); await folio.waitForSelector(".class-success-message"); const text = await page.$eval( ".form-success-message", (eastward) => e.textContent ); expect(text).toContain("Yous are at present signed in."); }); it("shows an error message if authentication fails", async () => { wait page.goto("http://localhost:5000"); await page.waitForSelector(".class-header"); await folio.click(".form-input__email"); await page.type(".form-input__email", "[email protected]"); await page.click(".form-input__password"); wait page.type(".form-input__password", "password123"); await page.click(".form-submit-button"); await folio.waitForSelector(".form-fault-text"); const text = await page.$eval(".course-error-text", (e) => east.textContent); expect(text).toContain("Delight enter a correct username/password."); }); afterAll(() => browser.shut()); }); In the outset test, we tested for a success bulletin after logging in successfully using Puppeteer to fill the course. The input fields are targeted and filled with the right details using their CSS classes. We do this using the .click and .type methods. The submit button itself is and so clicked and, because the course was filled with the correct login details, we wait to meet a text with the CSS class class-success-message. We also expect it to contain the correct text.
The second test is like to the first test except that information technology is testing for an error message when authentication fails. The examination is given incorrect login details and nosotros expect it to detect an error message with a CSS grade of course-error-text.
Once more, build the app and start a static server with the command below so that the React app is available at localhost:5000:
yarn build && serve -south build
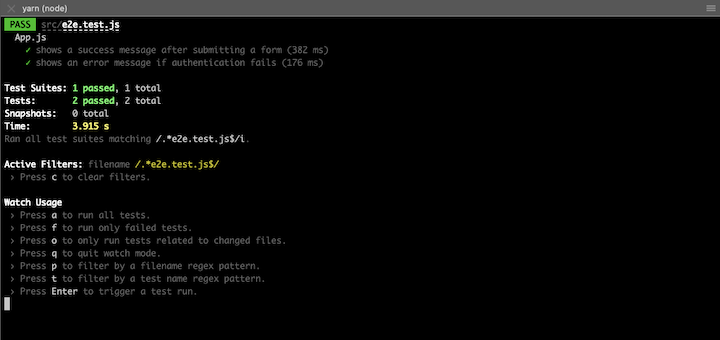
Then, run the yarn exam:e2e control in some other terminal window/tab and the examination should laissez passer successfully:
Debugging options with Puppeteer
Puppeteer also provides some boosted debugging options that can be useful for testing React apps stop to end. Permit's go over some of these options and walk through how to add them to an existing test.
Headless mode
By default, Puppeteer loads the Chromium browser in headless mode. A headless browser is a browser with no visible UI beat out but that all the same offers the full features of a normal browser. It is a bang-up tool for automated testing and server environments.
To see what the browser is displaying while the test is running, launch a full version of the browser using headless: fake:
beforeAll(async () => { browser = await puppeteer.launch({ headless: false }); folio = await browser.newPage(); }); Now a Chromium browser will be launched when the test is run.
Slow mode
With headless mode enabled, sometimes it tin exist difficult to continue upwards with what'due south happening on the actual browser. For example, form submissions happen very fast because, of class, information technology'due south being typed in about instantly and not by human beings.
To see what'southward actually happening in a exam, Puppeteer has the slowMo selection, which slows down Puppeteer operations by the specified amount of milliseconds:
beforeAll(async () => { browser = await puppeteer.launch({ headless: false, slowMo: 250, // slow downwards by 250ms }); folio = await browser.newPage(); }); Emulate devices using page.emulate
The page.emulate() method enables you lot to emulate certain device metrics and its user amanuensis. Backdrop such as the device's width, height, and user agent can be modified:
beforeAll(async () => { browser = look puppeteer.launch({ headless: simulated }); folio = await browser.newPage(); page.emulate({ viewport: { width: 500, height: 900, }, userAgent: 'Mozilla/v.0 (Macintosh; Intel Mac Os 10 11_4) AppleWebKit/537.36 (KHTML, like Gecko) Chrome/91.0.4472.114 Safari/537.36', deviceScaleFactor: i, isMobile: fake. hasTouch: false, isLandscape: false }); }); To make emulation easier, Puppeteer as well provides a listing of device descriptors that can exist obtained via the puppeteer.devices array. To emulate an iPhone 6 without explicitly specifying the width, height, or user agent like the one above, you would write the test similar this:
const iPhone = puppeteer.devices['iPhone 6']; beforeAll(async () => { browser = await puppeteer.launch({ headless: false, slowMo: 250, // tedious down by 250ms }); folio = expect browser.newPage(); wait page.emulate(iPhone); }); Using Jest Puppeteer
Jest Puppeteer provides all the required configuration to run unit of measurement tests using Puppeteer. This ways Puppeteer tests can be written with less setup and in a simplified fashion.
Permit's ready information technology up quickly to see how it differs from the method we've been using for the previous tests. Go ahead to clone the GitHub co-operative or follow the instructions beneath.
First, install Jest Puppeteer with the command yarn add -D jest-puppeteer and then create a jest.config.js file and edit information technology with the lawmaking below:
module.exports = { preset: "jest-puppeteer", testRegex: "./*\\e2e\\.exam\\.js$", }; In the code block higher up, the preset for Jest is configured to be jest-puppeteer and at that place'due south also a regex for which filename patterns to look out for. Simply test files that friction match the regex will exist run.
Adjacent, create another file, jest-puppeteer.config.js, and edit it with the code below:
module.exports = { server: { command: "yarn commencement", port: 3000, launchTimeout: 10000, debug: truthful, }, }; I of the major advantages of using Jest Puppeteer is not **having to first build the site for production and then serve in a static server earlier running the examination. Instead, you can run the test command aslope an already running local dev server. All you need to do is specify the command and the port.
Next, modify the yarn:test:e2e command in package.json and so that it's controlled by Jest and picks upwards its configuration from the jest.config.js file.
"test:e2e": "jest -c jest.config.js",
Volition all that setup done, let's modify the existing form submission tests. Open the e2e.test.js file and edit it with the code below:
describe("App.js", () => { it("shows a success message later on submitting a form", async () => { look page.goto("http://localhost:3000"); await page.waitForSelector(".form-header"); await look(page).toFillForm('.form', { emailAddress: '[email protected]', password: 'password', }) await wait(folio).toClick('push button', { text: 'Submit' }) await wait(page).toMatch('You are now signed in.') }); it("shows an error message if authentication fails", async () => { await page.goto("http://localhost:3000"); await page.waitForSelector(".form-header"); look await(page).toFillForm('.course', { emailAddress: '[email protected]', countersign: 'password123', }) wait expect(folio).toClick('button', { text: 'Submit' }) await wait(page).toMatch('Please enter a correct username/countersign.') }); }); Equally mentioned above, Jest Puppeteer makes writing tests easier, which means we don't take to create an case of Puppeteer or create a new folio for every test suite.
Some other change is how the course is filled. Jest Puppeteer allows you to affirm that a form will be filled equally long you lot have a selector for the form to be filled and its input fields take a name property.
Jest Puppeteer also simplifies asserting that a push will be clicked by using the content of the button itself. And so in the test suites above, nosotros use it to assert that the button with the text Submit volition be clicked.
Finally, with Jest Puppeteer, asserting that a text is on a page becomes much simpler without whatsoever demand for selectors.
Since the examination above expects the input fields (email and password) to have a proper noun property, let'south add their respective names. Edit grade in App.js with the code below:
<input type="electronic mail" required placeholder="Email Address" className="form-input form-input__email" onChange={(e) => { setEmail(e.target.value); }} name="emailAddress" /> <input type="password" required placeholder="Password" className="grade-input form-input__password" onChange={(e) => { setPassword(e.target.value); }} proper name="password" /> One matter to note before running the examination is that Jest Puppeteer exposes three new globals: browser, page, context. There's a high gamble using these globals will trigger some ESLint errors in your editor, so add the code block below to the .eslintrc.js file to avert those errors:
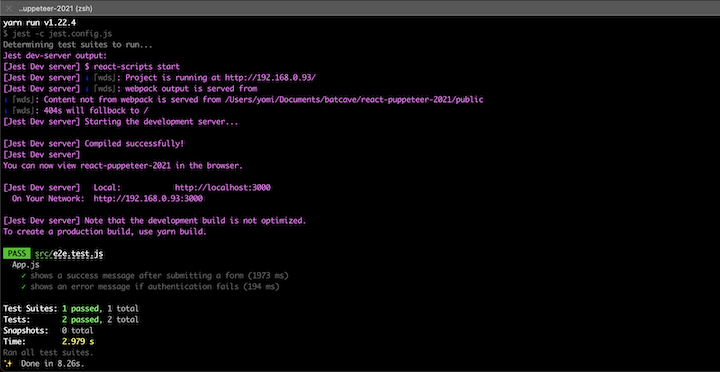
module.exports = { env: { jest: true, }, globals: { page: true, browser: true, context: true, jestPuppeteer: true, }, }; Now run the exam with the yarn test:e2e control and you should get an output similar to the one below, with all tests passed:
Conclusion
In this tutorial, we demonstrated how to write tests for React apps using Jest every bit a testing suite and Puppeteer for simulations such as typing in inputs, clicking, etc.
Jest and Puppeteer are a combination that can't become wrong when it comes to testing React apps. Puppeteer is all the same being actively adult, then make certain to check the API reference for more features.
The codebase for this tutorial tin be found on GitHub.
Full visibility into production React apps
Debugging React applications can be difficult, specially when users experience issues that are hard to reproduce. If you're interested in monitoring and tracking Redux land, automatically surfacing JavaScript errors, and tracking slow network requests and component load time, try LogRocket. 

LogRocket is like a DVR for web and mobile apps, recording literally everything that happens on your React app. Instead of guessing why problems happen, you can aggregate and report on what land your awarding was in when an result occurred. LogRocket also monitors your app's performance, reporting with metrics similar customer CPU load, client memory usage, and more.
The LogRocket Redux middleware package adds an extra layer of visibility into your user sessions. LogRocket logs all actions and land from your Redux stores.
Modernize how y'all debug your React apps — showtime monitoring for free.
Source: https://blog.logrocket.com/react-end-to-end-testing-jest-puppeteer/
0 Response to "Opening and Closing Puppeteer Instances Over and Over Again"
Post a Comment